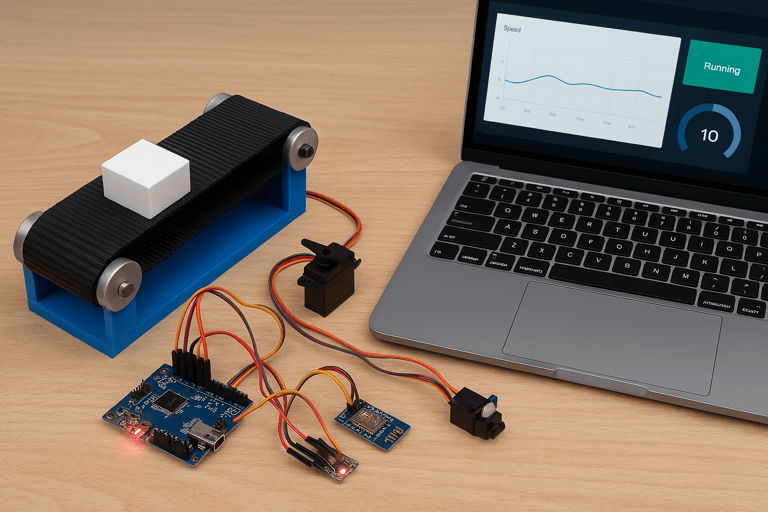
Smart Conveyor System with IoT Monitoring
This project shows how to build a smart conveyor system that:
- Sorts products using IR sensors and servo motors
- Monitors speed and status in real-time
- Sends and receives data via the FAVORIOT IoT platform
1. Project Goal
✅ Automatically detect products, sort them, and adjust conveyor speed
✅ Send data to FAVORIOT Cloud for real-time monitoring
✅ Remotely control speed using the FAVORIOT Dashboard
2. Main Components
| Component | Purpose |
|---|---|
| Arduino/ESP8266 | Microcontroller |
| IR Sensor | Detect object on conveyor |
| Servo Motor | Product sorting & speed control |
| ESP8266 WiFi | Send data to FAVORIOT |
| FAVORIOT Platform | IoT Dashboard & Data Analytics |
3. System Design
🏗️ Hardware:
- Conveyor with IR sensor and servo motor
- Controlled by Arduino + ESP8266
☁️ IoT Setup:
- Data sent to FAVORIOT cloud via WiFi
- IoT Dashboard displays:
- Speed
- Status (Running/Stopped)
- Product Detected
4. Wiring Diagram
- IR Sensor → Arduino digital pin
- Servo Motor → PWM pin
- ESP8266 → TX/RX (for WiFi communication)
5. Sending Data to FAVORIOT
Step 1: Sign up at FAVORIOT Platform
Create a new device called Smart_Conveyor_001 to get your API key.
Step 2: Arduino Code (ESP8266)
#include <ESP8266WiFi.h>
#include <ESP8266HTTPClient.h>

const char* ssid = "Your_WiFi_Name";
const char* password = "Your_WiFi_Password";
const char* server = "http://apiv2.favoriot.com/v2/streams";
const char* api_key = "YOUR_FAVORIOT_API_KEY";

void setup() {
  Serial.begin(115200);
  WiFi.begin(ssid, password);
  while (WiFi.status() != WL_CONNECTED) {
    delay(1000);
    Serial.println("Connecting to WiFi...");
  }
}

void loop() {
  if (WiFi.status() == WL_CONNECTED) {
    HTTPClient http;
    http.begin(server);
    http.addHeader("Content-Type", "application/json");
    http.addHeader("Apikey", api_key);

    String jsonData = "{\"device_developer_id\":\"Smart_Conveyor_001\",\"data\":{\"speed\":100,\"status\":\"Running\",\"product_detected\":1}}";

    int httpResponseCode = http.POST(jsonData);
    Serial.println(httpResponseCode);
    http.end();
  }
  delay(5000); // Send every 5 seconds
}
6. IoT Dashboard on FAVORIOT
Use the built-in dashboard or tools like Node-RED to:
- View real-time speed and status
- Count products
- Display alerts when needed
7. Receiving Control Commands (Remote Control)
Use FAVORIOT’s API to send speed commands to your device.
Example JSON Payload:
{
  "device_developer_id": "Smart_Conveyor_001",
  "data": {
    "speed": 50
  }
}
Arduino Code to Read Command:
String speed_value = received_data["data"]["speed"];
int motorSpeed = speed_value.toInt();
analogWrite(motorPin, motorSpeed);
8. Testing & Simulation Checklist
✅ IR Sensor Test – Detect object presence
✅ Speed Test – Change speed via dashboard
✅ Data Transmission – View updates on dashboard
✅ Sorting Automation – Simulate sorting flow
9. Summary & What’s Next
✅ Project Highlights:
- Remote monitoring & control
- Real-time speed and object status updates
- Simple integration with FAVORIOT
📈 Future Enhancements:
- Add AI Camera for advanced object detection
- Use Machine Learning to adjust speed automatically
- Switch to MQTT for faster data transmission
This project proves that IoT + automation can enhance productivity and reduce human error in smart manufacturing. With the FAVORIOT Platform, developers can scale up easily and integrate analytics, alerts, and AI features.